1035
1037
A round table discussion
The following email conversation got started with a report and some questions from Carl Oehme in Winnipeg.
Carl raises some questions about preventing hairline cracking in the heater facing.
He also reports on his own experiences and experiments with castable refractory.I copied the exchange to some other, very experienced, heater masons.
A lively conversation ensued.
It is a great example of MHA's collaborative spirit of information exchange.
Norbert Senf
--------------------------------------------------------------------------------------------------------------
Date: Wed, 28 May 2008
From: Keystonemasonry <carl(at)keystonemasonry.ca>
Subject: My first lab tests
To: Norbert Senf <mheat(at)heatkit.com>
Hello Norbert, I appreciated your last e-mail. However, I still consider my self an apprentice stove mason even after over a dozen installs now and have been struggling getting nice looking designs on the pc.... but am learning. I do a lot of copy and pasting and that works out not too bad without actual scale. Also, we still get minor stress cracking in some of our facings and it really is something I'd like to eliminate. Most of my facings are with limestone so I've used the white masonry cement adding extra lime and sand to simplify a soft mix. In retrospect would an all lime sand mix in the cavity fill lessen the stress on the facing? Another possible reason for the cracking is that the limestone bed depth is very irregular, eg: between 80-110mm, and with that irregularity there is a lot of steps on the inner surface of the facing??? What are your thoughts on this?
And onto making my own castings. I purchased a skid of Duquesne Floorcast in 2005, made a few pieces and left it being too busy with regular contracting and lack of heater orders or a heated shop for the winter. I semi-solved that problem by acquiring a place in 07 and converted part of the over-sized garage into a heated work area. Sure enough, my first castings resulted in failure. The product had sat too long and retained some moisture resulting in hard clumps. I crushed it up but it had gotten too weak. I added Fondu ciment with ensuiuing successful results. My conclusion is that buying a skid to save a couple of bucks only costs you money if you can't use it within 6 months. Years ago you could buy 10 bags of castable and if you had 2-3 bags extra it was still good 5 years later.
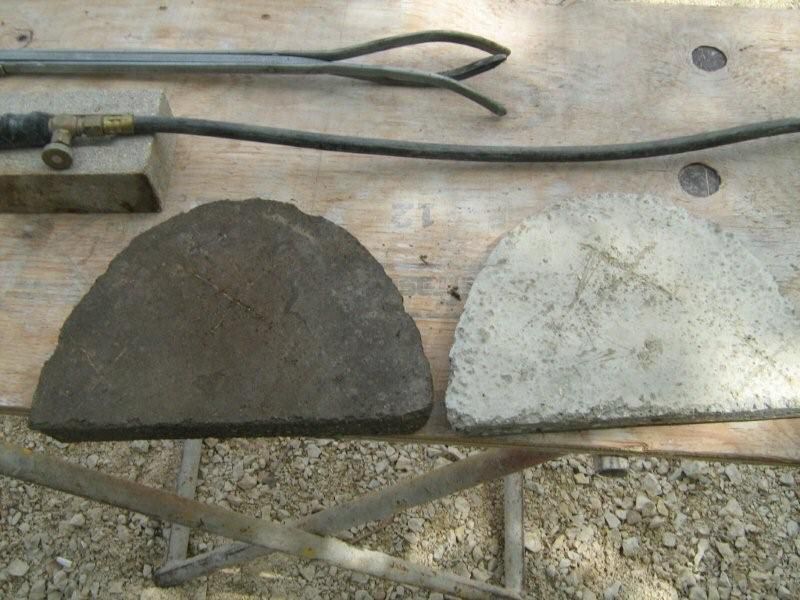
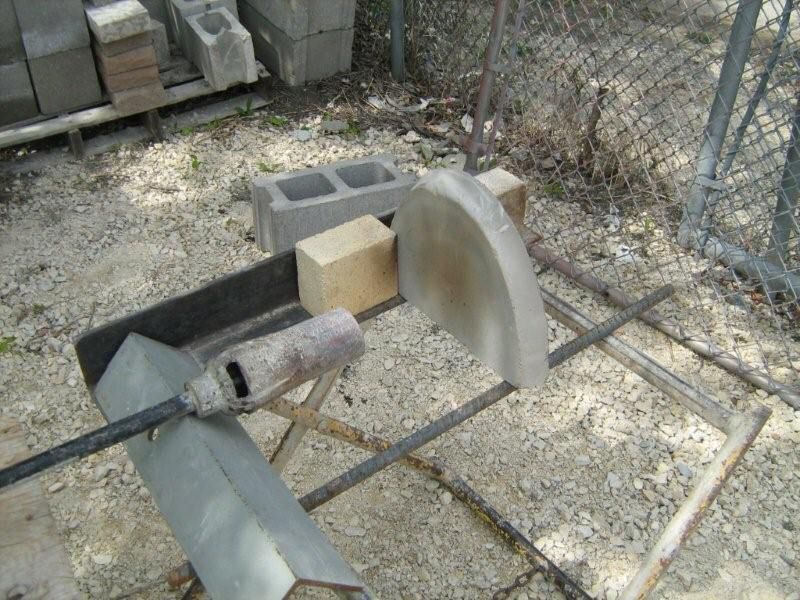
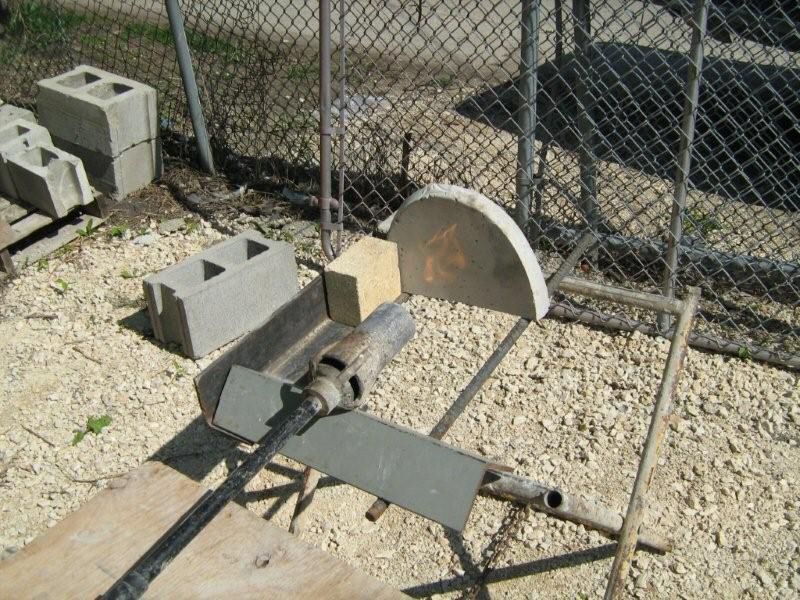
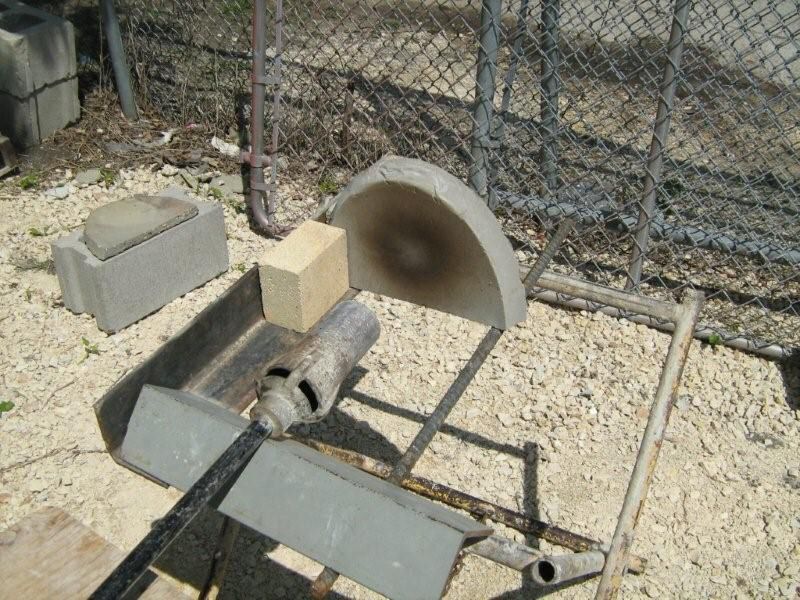
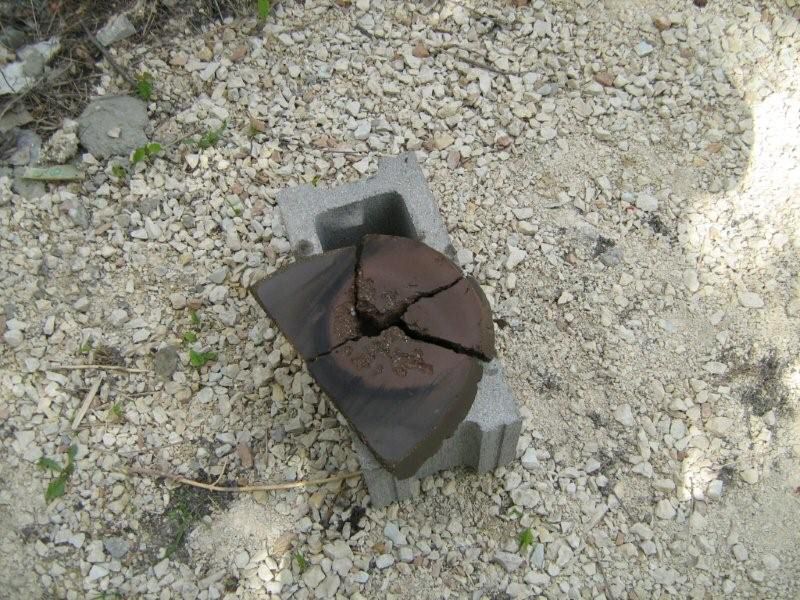
So now I'm experimenting with using Fondu ciment and local plaster sand(washed with no clays). Attached are photos I've taken. I cast all pieces 6 weeks ago. I made one piece using Dusquesne floorcast w/ fondu added. Three more using fondu/plaster sand in the following ratios: 5-1, 6-1, and 8-1. I fire tested all pieces to-day.
I tested the Floorcast first with a propane torch on low heat for 1 hour and then put in a bucket of water. See photos 987, 990 & 992.
Next I tested the 6-1 mix. See photos 993, 995 & 1033. Last photos are post test.
Photos 1034 & 1035 are a side by side view of the first 2 tests, front and back. The scratches I made with a key was to see if there was any flaking or spalling on the two samples. In the centre of each test piece where the torch was concentrated I was able to easily scratch the surface while the lower corners were still hard on BOTH samples. I'm sure that the surface temp of the concentration area was over 2000 deg. but my infrared gun only goes to 650 deg.
Finally I tested the 8-1 mix. See photos 1037 & 1039. I was actually happy to see this sample fail. I think someone once said something about failure can show you the way to success. I havn't tested the 5-1 sample since the 6-1 appeared successful. I intend to refire the first 2 pieces again with a bit higher intensity heat just to see what happens.
Can you comment on my testing methods and offer additional methods I havn't thought of.
best regards,
-Carl
1035
1037
0987

0992
0993
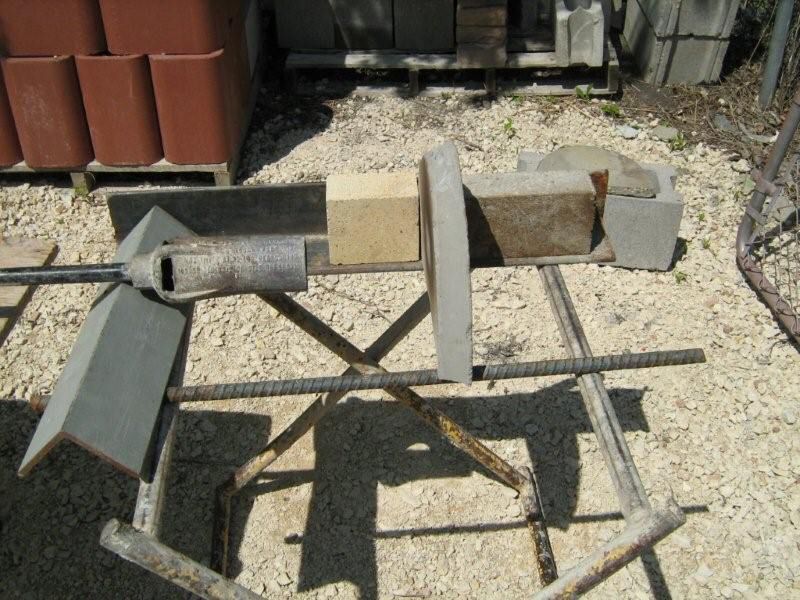
0995
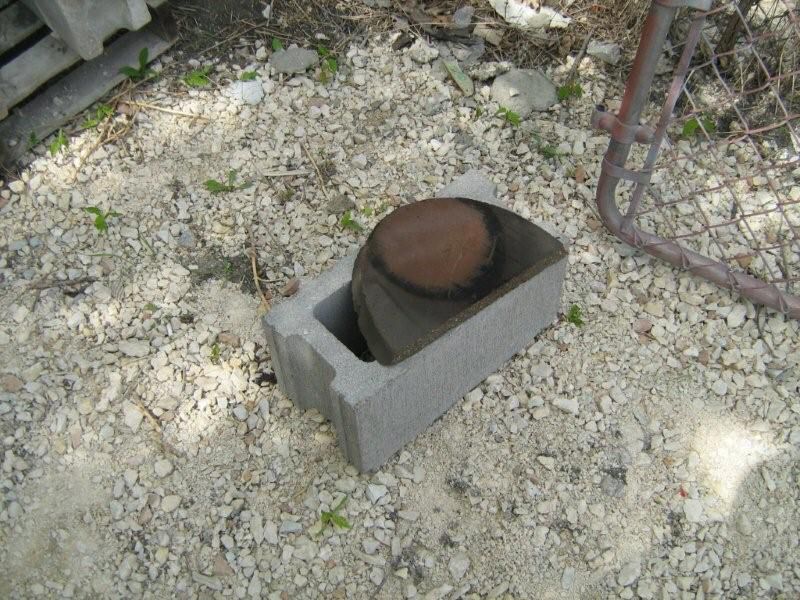
1033
-----------------------------------------------------------------------------------------
(Reply by Norbert Senf):
Hi Carl:
The minor cracking is partly from pushing the envelope with larger heaters, and a full slush space for maximum heat transfer. A softer mud might help on the slush, but probably not by much. There's just a lot of heat coming up through that facing lintel. One thing you can do is put horizontal reinforcing in that area above the door - some pencil rod or stucco mesh strips in the bed joints, for example. Also, you could use a reasonably strong mud for the slush there, and do the equivalent of casting a bond beam behind the facing.
William Davenport adds ceramic fiber there, dispensing with the slush. I don't know if I'd go that route, but you could certainly add a strip of corrugated cardboard there, to cut down on the heat transfer from the core itself.
I'd probably go with the cardboard, and the bond beam, and throw in some bed joint reinforcement where doable.
A lot of guys use cardboard all the way around. You lose some heat transfer with that, although less than with the 1/4" mineral wool, which is also sometimes used.
See: http://heatkit.com/html/lopezj.htm
The Austrians have 2 systems, full contact and air gap. They figure they need to add 15% of channel length when they go to the air gap. Since the contraflow has short channels to begin with, you'd probably need to add 25% or maybe a bit more. I've seen 3 contraflow heaters with about a 1" air gap that hardly put out any heat at all. One was a client of mine, where they were able to retrofit the slush by grouting in from the top, and now the heater works great.
And onto making my own castings. I purchased a skid of Duquesne Floorcast in 2005, made a few pieces and left it being too busy with regular contracting and lack of heater orders or a heated shop for the winter. I semi-solved that problem by acquiring a place in 07 and converted part of the over-sized garage into a heated work area. Sure enough, my first castings resulted in failure. The product had sat too long and retained some moisture resulting in hard clumps. I crushed it up but it had gotten too weak. I added Fondu ciment with ensuiuing successful results. My conclusion is that buying a skid to save a couple of bucks only costs you money if you can't use it within 6 months. Years ago you could buy 10 bags of castable and if you had 2-3 bags extra it was still good 5 years later.
So now I'm experimenting with using Fondu ciment and local plaster sand(washed with no clays). Attached are photos I've taken. (snip)
That's pretty cool. I'm going to forward that to a few guys, who I'm sure will be interested.
Couple of things. The sand - I wouldn't use granite based sand for heavy duty parts like the firebox or bake oven. Limestone should be OK, but I haven't tested it enough myself. Your scratch test demonstrates the "twilight zone" that calcium aluminate ends up at if you heat it up enough to drive off the water of hydration, but not high enough to get a ceramic bond. This is the case in heaters, the castable never gets that hot, even in the firebox.
I'd go to a more rugged test. In Finland, the spalling test is to heat it up red hot and dip it in a bucket of water, and see how many cycles it will take. I put my samples on a big BBQ burner, and cover with ceramic blanket, and let it run full tilt for an hour (good for heating the shop).
Heikki told me the following (roughly, my memory ain't what it used to be):
Soapstone - 0-3 cycles
Castable - 5-10 cycles
Firebrick - 10-30 cycles
Let me know if you do more testing.
Have a good one ........ Best ....... Norbert
---------------------------------------------------------------------------------------------------
On June 1, 2008, Alex Chernov wrote:
Hi everyone.
Thanks for interesting information.
Just a comment on hairline cracking on stone facing. I observe such cracking on all my stone faced heaters just right around stones in some places (sure, mainly above the firebox door). I believe the major cause to this problem is different rate of expansion of the stone and mortar and overall larger units in comparison with brick. The fact that stone has to be set in a relatively much drier mortar (not to smear it) may add up to somewhat weaker adhesion. Having said this, I find such hairline cracking that follows stone line not visually distracting, and clients don't mind it if are told at the beginning that this is going to happen. The hairline cracks don't seem to get bigger over seasons of use. Note, I use cardboard everywhere.
And another comment about additional insulation behind facing above firebox door. A lot of heat rises off the firebox door by convection and heats up the facing in that area very fast to pretty high temperatures. Anyone can notice this. I think this fact that facing gets such rapid heat-up may also contribute to cracking around stones.
I should also say that we are kind of pushing limits with stone facings anyway by using materials that by definition are not the best for heater applications. I think minor hairline cracking is normal price for such aesthetic "push".
Best,
Alex
------------------------------------------------------------------------------------------------------
At 06:45 PM 6/1/2008 -0500, Eric Moshier wrote:
Hello Norbert,
Just a thought, but when I deal with high lime content mortars in historical
restoration you have to keep the mortar joints and stone moist for a couple
of days afterwards otherwise the chemical reaction within the mortar stops.
And that would weaken the mortar tremendously and cause failures in itself.
He did not say how he was wrapping the heater for expansion. Is he using
cardboard or ceramic blanket? I wrap everything in cardboard except over the
firebox and around all doors, I use 1/2" wool over these area's and have no
problems. I have stucco covered heaters that are 4 years old with no
cracks. I have had minor cracks above the firebox with cardboard. Using wool
over the firebox up to the oven has stopped this.
Eric
----------------------------------------------------------------------------------------------------------
From: "William Davenport" <info(at)turtlerockheat.com>
Date: Tue, 3 Jun 2008
Yes this is also my approach- 1/4" cardboard everywhere expect between firebox opening and bake oven floor, and also along the sides of firebox. Here I use either 1/4" or 1/8" ceramic wool and have no more cracking problems in those locations. Also, I believe it not to be a signifigant loss of performance.
William
------------------------------------------------------------------------------------------------------------
Date: Tue, 3 Jun 2008
From: Alex Chernov <alex_stovemaster@yahoo.ca>
Good idea. I'll try it myself. Thanks, Eric and William.
Alex
---------------------------------------------------------------------------------------------------------------
Date: Wed, 4 Jun 2008 05:49:18 -0400 (EDT)
From: Pat Manley <jpmanley(at)midcoast.com>
I use 1/2 inch min wool between the core of the heater and the faceing and
the side channels (contra flow design) because I agree the expansion is
the most severe there.
I see the side channels though, as a great place to extract the most heat,
and a location where direct contact between the channel liners and the
skin would be beneficial for heat transfer.
After I have the core built, I build up the side channels and the faceing.
I go up a few feet with the faceing and fill any inside voids and make a
smooth plumb inner surface w/ the cement or mortar.
Then I parge a layer of soapstone paste (soapstone dust mixed with just
water) about 1/8 inch thick up that inside surface, with a thicker layer
of perhaps 1/4 inch on the rear faces of the channels.
My side channels are, at the least, lined with firebrick 2 1/2 inches thick.
I lay up the firebrick smack against the freshly parged soapstone dust,
striving for good contact, but not compressing the paste. I figure that
the layer of soapstone will allow for expansion up and down, and the 1/2
inch of min wool against the core takes up the side to side expansion. The
extra thick parge on the back faceing accomadates the linear expansion of
the long wall of the firebrick channel.
I've been using this method for a few years now, starting with one in my
own place, I built 4 years ago.
I have been saving soapstone dust from my own projects, and even making
dust when I need to, butI believe that the New Alberene Soapstone in VA
has some soapstone dust for sale. Call and ask for Alan Turner for
details.
Best..Pat
-----------------------------------------------------------------------------------------
Date: Tue, 03 Jun 2008
From: Keystonemasonry <carl(at)keystonemasonry.ca>
To answer some of you that wanted to know, I've been using Norbert's design with the double wrap of fibreglass matting. In some early builds I had cracked stone bakeoven shelves and went to a 1" x 2.5" ceramic fiber behind the shelf and 1" X 3.5" between the angle iron lintels. This eliminated cracked stones over the door and significantly reduced stress cracks but not totally eliminated them. They now only occur like everybody says in the mid section front.
Again, 80% of my builds are with local limestone which are large stones and a soft material, not ideal for heaters but very popular here. They do not occur on every build and when they do they are very minor. I've also installed another precast core with the cardboard, but the squarehead in me says why waste that quarter inch with dead air when you can get more heat with close contact.
My next build will happen within a few days and will continue with the fiberglass and add the quarter inch ceramic fibre suggestion between the 2 doors and loading door jambs. This area is always the hottest and agree that a small sacrifice here to overcome the cracks will minimize overall performance loss. With summer approaching I may not see the results for some months to come.
Besides the whole house heater we will also be installing the small heater in the lower level. The small heater design is in the MHA portfolio and we are using the option with the 11.75" deep fibebox. Being my first small firebrick heater I'm wondering if it will perform like my little Tulikivi 1000 that I have in my house which has no slushing of spaces or cardboard or fibreglass wraps and hasn't got any cracks in it after 9 years of overfiring every winter. I understand that being small it doesn't have the same thermal stess as the large heater. Any thoughts?
best regards,
-Carl
-----------------------------------------------------------------------------------------------------------
Date: Wed, 4 Jun 2008 21:26:24 -0400 (EDT)
From: Alex Chernov <alex_stovemaster(at)yahoo.ca>
I would argue that two-ply cardboard should be very close in heat transfer properties to two layers of fiberglass. However, it is sure, subjective. I guess the main reason for me is recycling cardboard for good use and savings. It is very easy to work with and is available anywhere. To me, it justifies possible small difference in performance. I also have tried to use fiberglass on one heater. I didn't like to work with it and still had hairline cracking around stones.
Alex
-------------------------------------------------------------------------------------------------------------
Date: Wed, 4 Jun 2008
From: Norbert Senf <mheat(at)heatkit.com>
Hi Alex:
Check out the test we did at Wildacres in 2001:
http://heatkit.com/html/lopezj.htm
the mineral wool side clearly had less heat transfer than the cardboard side. The test was skewed a little towards the mineral wool, because it was outside and there was some wind. We didn't do a direct contact for comparison.
This would make a good project for Wildacres, when we have an enclosed space with no wind - do a side by side comparison of all 3 methods ........ Norbert
------------------------------------------------------------------------------------------------------------------
Date: Sun, 8 Jun 2008
From: Norbert Senf <mheat(at)heatkit.com>
At 09:14 PM 6/4/2008 -0500, Carl Oehme wrote:
Hello again Norbert, I didn't think asking a few questions would stir up so much interest, but it is all good information to hear what different guys are doing to eliminate those nasty hairlines. As mentioned in my general reply I'm going to wrap with your fiberglass system and include a quarter inch of ceramic wool between loading doors in addition to what I was doing before at the steel lintels. I'll also do a patch on the rear of the stove at the same location. See how that turns out. Somehow your bond beam idea doesn't make sense to me. I'm thinking soft for flexibility or crushability like the crushing zone at the top. If you put in a full strength type S mud in there wouldn't that hard patch create more pressure than the soft? Maybe explain to again.
Incidentally, the 2 tempcasts I've installed with the cardboard haven't cracked to my knowledge anyway. One was in 2001 and the other in 2004 and neither customer has ever called me back. I just don't care for that wasted dead air space. I liked the soapstone paste idea but would create extra cost to get that here unless I try to source some local carvers.
Definitely, the cardboard creates an air space, and you can't beat that for crack resistance. The question is, are you paying a performance penalty? It is easy, for example, to build a heater that will never crack under any circumstances, that simply doesn't put out any heat. Don't laugh, because I have seen it, and more than once.
Remember, the Austrians have two systems, air gap and no air gap (the traditional system). So, either one is valid, when it is done right.
If you think about how thermal expansion works, as a straight percentage increase in length (and thickness and height), then I'd come to the conclusion that I actually only need expansion at the ends of walls, ie, in the corners between the inner and outer skin, etc., because that's where the pushing is going on. Everywhere else, I only need a bond break (slip joint), so that the inner core doesn't lift the facing and give me horizontal cracks.
It is also useful to look at the various existing strategies. Tulikivis with the corner clips. Kachels with the internal spring wire clips (meaning that you can't pre-build the core).
Tensile plaster over shiners.
The lintel is a critical area in a large heater, in my view. As you know, I use a firebrick split heat shield system, where the heat shields slide forward to protect the steel facing lintel. Tempcast uses an air frame on their door, which I am also starting to look at. Mark Klein in Wisconsin uses our doors, and has an air frame fabricated for it locally.
Anyhow, a very interesting discussion, and hopefully it will be of use to stimulate thinking, experimenting, and sharing of results. I think it would make a great project heater at Wildacres next year. Do a tall firebox with a top horizontal exit channel. Then, run 3 or 4 parallel downdraft channels off that as heat exchangers, say, 8x8 or 8x12 flue liners. According to Grjimailo's buoyancy theory, the heat will be evenly distributed among all 4 channels. So, we can test that theory, for starters. Then, you've got 8 surfaces (front and back) to play with and try different things on - cardboard, 1/4" mineral wool, mortar slush, soapstone dust. On the back side, you do them all the same, to verify that the heat is distributed evenly.
If the cardboard comes out the same as direct contact, then end of story. On a small heater such as in William's article, with a thin responsive shiner facing, I can see cardboard as an advantage, as you'd want to tone things down a bit. You just need to check your stack temp, to make sure the heater doesn't saturate early, ie., doesn't lose heat into the chimney at the end of a big load.
If I had to guess, I'd say the cardboard is halfway between, in the Austrian direct contact vs. air gap designation. That would suggest a need for a bit of extra heat exchange. But, that's speculation on my part at this point. Certainly, on the double bell system, you are getting very good heat exchange, so maybe less of an issue there than on a contraflow....................Norbert
---------------------------------------------------------------------------------------------------------------------------
From: Stephen Bushway <sbushway(at)mac.com>
Date: Sat, 14 Jun 2008
Alex et. al.,
I"ve talked a few people out of building a heater (weekenders, owners of drafty old houses, etc.) but never tried to sell one. Once they get in touch with me, they're sold. Now, I think people get overblown claims from people who heard it from someone, who knows someone .....so by the time it gets to a customer, its totally over-blown. But your point is well taken. We definitely should be telling people to expect some hairline cracking. If you're selling heaters to have a thriving business, you're in the wrong business. I like building and restoring fireplaces and working locally, rather than following heater leads around the region. It hones my masonry skills and lets me be at home with my family every night. When a local heater prospect comes along, great.
There was an active Tuli Kivi dealer near me who installed a lot of undersized Tuli's that were ove-rfired. No blame on how they got sold and installed. Some owners just scaled back their expectations of them and accepted a 30 or 40% contribution to their heating. One had his removed and I rebuilt the firebox with firebrick and it heats my office. Your final comments on unmet promises are spot on. Your look so much better in the customers eyes when their expectations are met or exceeded. We all have to live with our self esteem, after all.
Regarding your 2nd paragraph. I've actually had more visible cracking with brick facings. I think the discussion should focus on thermal expansion allowance, rather than the merits of one facing's crack resistance over another. I think thats the crux of the issue. If the expansion is allowed for, then the facing is only exposed to the heat radiated across that expansion joint - no problem. If the expansion joint is insufficient, heat expansion of the core is an un-stoppable force and no mortar bonded facing material can resist it.
Thanks for your thoughtful comments.
Steve
On Jun 13, 2008, at 10:43 AM, Alex Chernov wrote:
Hi everyone. My five cents:
- We would need and enclosed shop to run at least somewhat reliable test at the Wild Acres. I don't think we should treat results achieved under open skies with wind etc as very reliable. Also, if we do such test, it is beneficial to use as many different stone types typically used in heater facings as possible, again, for the reason that different stone has different thermal properties that affect its expansion characteristics.
- The way particular stone behaves in the facing will change each time due to the fact that different stone types are used, and that even the same stone type can have very different composition. Size of stone units and way of setting them in mortar, as well as mortar type, all is going to have its effect. This is why I believe there is no one-fits-all solution for this problem, with exception of, perhaps, dry-laid stone look where no cracks can be seen for the reason that you cannot see mortar joint. This is why I dont't think we will benefit from such one-time testing. It is wise, however, for someone using the same type of stone, to try different ways to see if it does give a noticeable relief.
- If we look at countries that have heaters for centuries, they have much more tolerance towards some hairline cracking and maintenance. Traditional single-wall kahelofens, for example, need to be repointed once in a while for the reason that single-wall kachel facing moves and grout between tiles cracks and falls out. They also have to be rebuilt completely once in 25-30 years. Everyone knows this and is fine with it as percieves this as normal. The same applies to the single wall brick heaters in Eastern Europe. Cheap building materials, and locally dug clay for mortar work fine in building well-performing heaters, and nobody minds repointing clay joints once in a while because it is normal and is percieved as a small price for a very efficient and sustainable way of heating their houses. Sure enough, as Norbert also stated, we are pushing our heaters to heat huge buildings, and want them to still look like normal fireplaces and have fancy facing. As I have already said before, everyone should be prepared to pay certain price for such push.
- I would say again that I believe this problem is essentially a problem with over promising our clients, exaggerating what heaters can do and what is possible with heaters. There are no miracles and there is a price for anything. I agree that a good relationship with clients and honest and open discussion of all aspects of the heater construction, including choice of the facing material and its possible behaviour BEFORE beginning, is the key. Like in every business involving customers, we want to exceed expectations, or at least meet them, and one way to do so is stop over promising. Otherwise we get into a position where they are unhappy and we look like liers. I think we all learn it the hard way - some faster some slower. I find that situation will inevitably stink if anything, even the smallest thing, is over promised and not achieved. And it doesn't matter if that thing is simply impossible to achieve - this is all about our promise and about keeping our own word. One of the wise advice of yoga gurus is to never promise unless you absolutely sure it will be achieved. They believe that broken promises have a heavy influence on our karma. I would also add that they have heavy influence on our reputation and sometimes on our purse. I know from my own experience that not over promising is a much better way to go then ending up feeling guilty for something that is beyond our control.
I also think that this topic falls perfectly within a proposed and much needed conversation at the next meeting : " Common myths in heater building - finding the truth".
Best.
Alex
---------------------------------------------------------------------------------------------------------------------------
Date: Sat, 14 Jun 2008
From: TomTrout <bphette(at)yancey.main.nc.us>
Hello,
In response to cracking I have to say I have tried most of the techniques mentioned, And eventually there becomes a crack at the top of the door around the heater and sometimes it is only on one side. I have acquired cracks around my eyes, mouth, navel and possibly other orfaces that I cannot notice...call it heavy use and time.
My techniques of treatment of the space between the veneer and the core has evolved from my own experiences and the comments of those more experienced that I. After working with some German heater builders in the mid 80's as I was interested in traditional tile veneer, I became an advocate of building the veneer to a comfortable working level and then applying a mixture of one clay and one sand 1/4" thick to the inside of my brick veneer. This is to eliminate any leaks and holes on the inside and to act as mastic for the 1/4" rockwool that I apply to the inside of the veneer. I then build the side channels by buttering the brick and not the bed and pressing tight to the wool (if the wool bothers you, kraft paper can be applied to protect your environment). On the two ends of each side channel that face the firebox (top of this 'U') I apply 1/2" fiberfracs, the white wool. I then build the firebox to contact all the mentioned gasketing. All areas are treated the same accept below the firebox floor, where I build without gasketing and use mortar instead. I sponge all the work as I build
This technique is a very quick way to build a heater. You only require plmb level for the veneer and if accurate every brick will fall into place. I am worried about leakage from the veneer cracks and I believe the wool solves that problem. With cardboard and a continous air space, as the German builders I worked with practiced, I worry about veneer cracks to other areas with cracks in the core and the heater sucking room air into the combustion area and therefore compromising the efficiency. I think the cardboard may dissolve in high heat areas (?) and that an air space around would be very bad for the negative pressure created by the draft.
The Finnish heaters were often built with brick to the size of an enamelled, steel casing that could be purchased at a hardware store in the color and design of your choice or plane steel and then painted. After being bolted in place on a single skin heater and when properly done, one could forget about all the above mentioned problems. This style is the common man's unit and is what is seen in schools and public buildings throughout Finland and it could be the next evolution of N. Am. heaters.
Best to all
Tom
-----------------------------------------------------------------------------------------------------------------------------
Date: Sat, 14 Jun 2008
From: Alex Chernov <alex_stovemaster(at)yahoo.ca>
Subject: Re: My first lab tests
Hi everyone.
About cracks in brick facing.
Sure, all cracking is the result of thermal expansion and contraction. However, it is not only the result of how well the core is gasketed from the facing. Uneven heating pattern of the facing walls may very well lead to it. In Russia, they had annoying cracking in heater designs with system of channels that didn't facilitate even heating of the walls. For example, vertical baffle system - the further from firebox - the cooler were the walls. Those heaters were single-wall clay brick, and yes, they cracked quite extensively. Later design solutions like down draft systems including contraflow, had better, more even heating pattern and had less cracks accordingly.
Bell, or channelless heaters got to almost ideal heat distribution: gases stratify inside bell and as such each horizontal cross section has the same temperature (gases at the same level have the same temperature inside a volume where they can move freely by gravity (buoyancy). In general, I see no cracking in my brick facing. I use soft mortar 1:2:9 (cement:lime:sand) and always mix my own.
We shouldn't dismiss this effect of uneven heat distribution in the facing while thinking about cracking problem. Sure, double wall system takes stress better, but still follows the same laws. Tulikivi has additional liner of the soapstone at the side channels - isn't it for equalizing temperatures? What we do here, in N.A. quite often pushes us to extreme and leads to unortodox solutions. This is where we have to keep our minds alert.
In terms of steel lintels, I have seen steel lintels warping like crazy and burning completely out to rust powder IN THE FACING, not even in the core, of commercial sauna heaters. Sure, they get over fired daily (3 to 4hours continiously once a day), but this fact along keeps me away from using steel in the core. I do use steel lintels in the facing of residential "normal" heaters and typically there is no problem. I follow Jerry's advice and cover the lintel with flashing to avoid its contact with mortar.
Best,
Alex
---------------------------------------------------------------------------------------------------------------------------------
From: Norbert Senf [mheat(at)heatkit.com]
Sent: Saturday, June 14, 2008
To: Alex Chernov
Hi Alex:
Excellent points, all of them. Thanks.
As far as proposed testing, all I am proposing to
test is heat transfer, not cracking.
It relates to cracking in the sense that, if I
want to build an extreme heater, say with a 1" air space
between the core and the facing, how much heat transfer penalty do I pay?
Theoretically (from thermopane windows), there
should be no difference between a 5/8" air space and a 1" air space,
because of convection.
We already have some rough idea of a difference
between mineral wool and cardboard, and it would be interesting to
see what difference there is between cardboard and direct contact.
It would be interesting also to instrument the
lintel area with thermocouples, and find out which mechanism of heating
the lintel stone dominates: from below, from
behind, or from the front by convection. And at what speed.
Best ..............Norbert
---------------------------------------------------------------------------------------------------------------------------------
From: "Eric and Tracy Moshier" <srmason(at)cpinternet.com>
To: "'Norbert Senf'" <mheat(at)heatkit.com>
Date: Tue, 17 Jun 2008
Hello Norbert,
I have been in Arizona and missed some of the discussion. It hit 112
degree's when I was there, 2 days before that I was wearing long johns
because it was in the 30's in June. So much for global warming.
Anyways.
Two years ago I tore down the facing of a heater that was not built by me
because the homeowner said that the heater was not radiating heat very
evenly in most areas of the heater. I had her light a fire in the morning,
one in the evening and another one the next morning so that I knew the
heater would be about as hot as it was going to get. I stopped by at about
noon on the 2nd day to see what was going on. This heater was faced in 3-5"
round granite cobble fieldstone. I marked all the area's with caulk that
were not heating up like they should. These area's were barely warm so the
temp might have been 100 if they were lucky. I did not have a laser heat gun
at the time to give you more accurate numbers. I have since bought one and
love it for R & D.
I told her that this was unacceptable and tore the facing off. In every area
that was marked with caulk there was a gap between the core and the facing
from 1"-2". Mortar was not slushed tight to the cardboard.
I put new cardboard around the core, layed up a firebrick shiner and then
installed a 1.5" thick thin veneer granite fieldstone onto the firebrick.
She said it was like night and day the amount of heat that comes out of the
heater now. I would have to do testing at my own shop before I put an air
space greater than 1/4" between the core and the facing.
This is a great little informational chat thing that you started. It helps
everyone learn from everyone else's mistakes and as far as I know that is
what we are in the MHA for. To help each other and our cause out.
Thank You
Eric
--------------------------------------------------------------------------------------------------------
Date: Fri, 1 Aug
From: "Marcus Flynn" <pyromasse(at)gmail.com>
To: "Norbert Senf" <mheat(at)heatkit.com>
Subject: Hairlining or worse
Hi Norbert,
I just got time to read the discussion on expansion gaskets and stress cracking. I learned a lot and am pleased to see that we are networking on these problems.
Please tag this mail on to the E-zene link
I too inform my clients that it is normal to have hairline fissures, and if they occur, some clients even seem happy.
Whatever evasive action we may take, I think that the variable of client operational practices may play a large part in hairlining.
I have had real cracks (Not hairlines) running between both openings when the oven and fire box opening have been on the same face. This has happened on only two heaters, both built during the last two years.
What these heaters have in common is:
They are both extremely low due to low ceilings.
They both are fitted with Upo 0030 fire box doors. I see possible issues with the design of this arched door on a square frame -- if the door is raised on the facing to place the bottom of the arch's voussoir above the core's lintel, the lintel would be visible through the glass. So the bottom of the voussoir are by neccesity directly exposed to radiation.- ie not shielded by the core's lintle.
Both clients are big fire men.
Now in this situation, I add mass to the core behind the lintle to act as a thermal sponge. And lay a sheet of half inch wool over the standard gasket behind the arch on the facing. This is an attempt to defuse transfer over mass and time.
I am almost sure these cracks are not due to the core expanding against the facing.
I place 4 sheets of 400 g fiberglass mat on front and rear faces, and one sheet on the sides. I cut this down to 3 sheets front and back with 500 g mat.
My main reason for adding to the discussion though is to describe what I have been encountering in Europe.
Heikki once showed me a heater, at a trade fair in Helsinki, that had one and a half inches of rock wool between core and facing. He explained that this was to impede heat transfer.
In modern highly efficient Finnish homes, the objective is to have one fire every three days. I also saw a heater Double H ( as he is known in France,) and two Eastern masters had built in the Central Massif. This too had one and a half inch sheets of wool between core ang facing. The client heats his bio-dynamique home only with the heater.
Many people who have installed Steatite prefab heaters in well insulated homes here in France are complaining of over heating. The collective French response has been to move towards unburnt clay brick as a facing material. Apparently raw brick have the same capacity of thermal storage as burnt brick, but way less transfer capacity. Again the objective is to have one fire every two or three days.
People building in old homes with 3 foot thick uninsulated stone walls are definitely not suffering from over heating, and are building heaters gasketed as those we build in N A.
I have only built orthodox NA heaters in France, but I have a client next year who is insisting on unburnt brick facing, as he is building a log home. I am nervous about it, but he is a former client ( in a stone house) who is well educated in thermal dynamics.
Marcus Flynn;
-------------------------------------------------------------------------------------------------------------
Date: Sun, 17 Aug 2008
From: "Lars Helbro" <lars(at)stenovne.dk>
To: <mheat(at)heatkit.com>
Subject: About cracking in the heaterface
Dear Norbert
We have been in contact before, but it was years ago.
I read with big interest the debate at MHA´s site about cracks.
Here in Denmark, we almost only build single-skin heaters, mainly because of the weather conditions.
Of course we experience cracks too, but through the years (about 20) we have found ways to minimize them,
that are not mentioned in the discussion, and maybe it could be useful to some.
The way we build our "traditional" heaters is sligtly different from Heikki´s version in the 80´s.
Most of it you can see in Bujnas report from our work-shop in Hungary this summer:
http://www.mha-net.org/docs/v8n2/docs/080704bujna.htm
(By the way - the "mysterious" holes in the bakeoven is explained here on my own site:
http://www.stenovne.dk/englishcentrifugalcarburator.html )
About the cracks.
Why they come: As one (i think Alex) said in the discussion, the brickwork is not heated up equal.
On a contraflow heater, the sidewalls will be heated up first, and from the inside.
On a single skin heater, this will happen quite rapidly.
When the inside is heated up faster, than the outside, the walls will try to bend, since the inside will expand faster than the outside.
The forces are away from the middle, and since there very often is less brickwork in the face than the back, the cracks will occur here.
(This is only a theory, but it corresponds with natural laws)
What we have experienced that help us:
We only use clay mortar, since the cracks will be very easy to repair for the customers, and we teach them how to do that.
I very much agree with Alex, that it is important to teach the customers what might happen, and how to maintain their stove. (A little water and a thumb will often be enough, when it is done in time).
Most important here though - the quality of the sand in the mortar has a great effect on how big, for how long, the cracks will be. With very good quality sand, they might not come at all !
The importance of the quality is, how sharp the sand is and the mix of different sizes.
We use 0 - 4mm in a (if possible) reasonable equal amount of every size.
If the small sizes is missing (0-2mm) we have to use more clay, and be aware of the risk for drying cracks.
If the bigger sizes (2-4mm) is missing, the risk of crackings are bigger, and will come back more often after repair.
Round sand particles (e.g. from the beach), will make troubles for the customer for the life of the stove.
Many years ago i built a masonry heater for my grandaughter in Norway. The sand was sharp as broken glass, and my fingers where bleeding before i finished.
This stove has been used very heavily ever since, but has never shown any signs of cracks.
I think, that sharp sand has about the same effect, as metal reinforcement, but it will stay there forever.
About the castable quality:
As you maybe can see at the pictures of Bujnas, we have given up upon this product.
From our experience, it only makes trouble.
After we quit that (about 8 years ago) we could fire up every single stove we built immediately after it had been closed. This has given us much more experience with every single stove, and we can keep warm when we make the finish if it is in the winter time. (In the summer it can get quite hot, but we do it anyway - of course). The customers are very pleased with that, since there is no bigger trouble, than new toys you are not allowed to play with immediately.
I think, that this also has some importance for the decreasing of cracks.
When we fire up a new stove, the mortar is still very wet, so the stresses can much better be absorbed in this period, that often last for a couple of days with a reasonable fire each day.
Like children, they can learn more easily what its all about, when they are soft and easy to bend :-)
I have never experienced any trouble with the core, and i think that this correspond very well with Heikki´s experience with soapstone, castable and firebricks.
(4 glowing firebricks in 90ltr. of cold water in a mortar pan makes very nice nice bathing water in about 3 minutes :-)
Nice to know when you are on a dirty job with no bathing facilities.
Best
Lars
www.stenovne.dk
Horskærvejen 4 Drejø
5700 Svendborg
tlf.: (+045) 23 23 93 39
email: lars@stenovne.dk